Kimchi Bokkeumbap (Kimchi Fried Rice)
INTRO
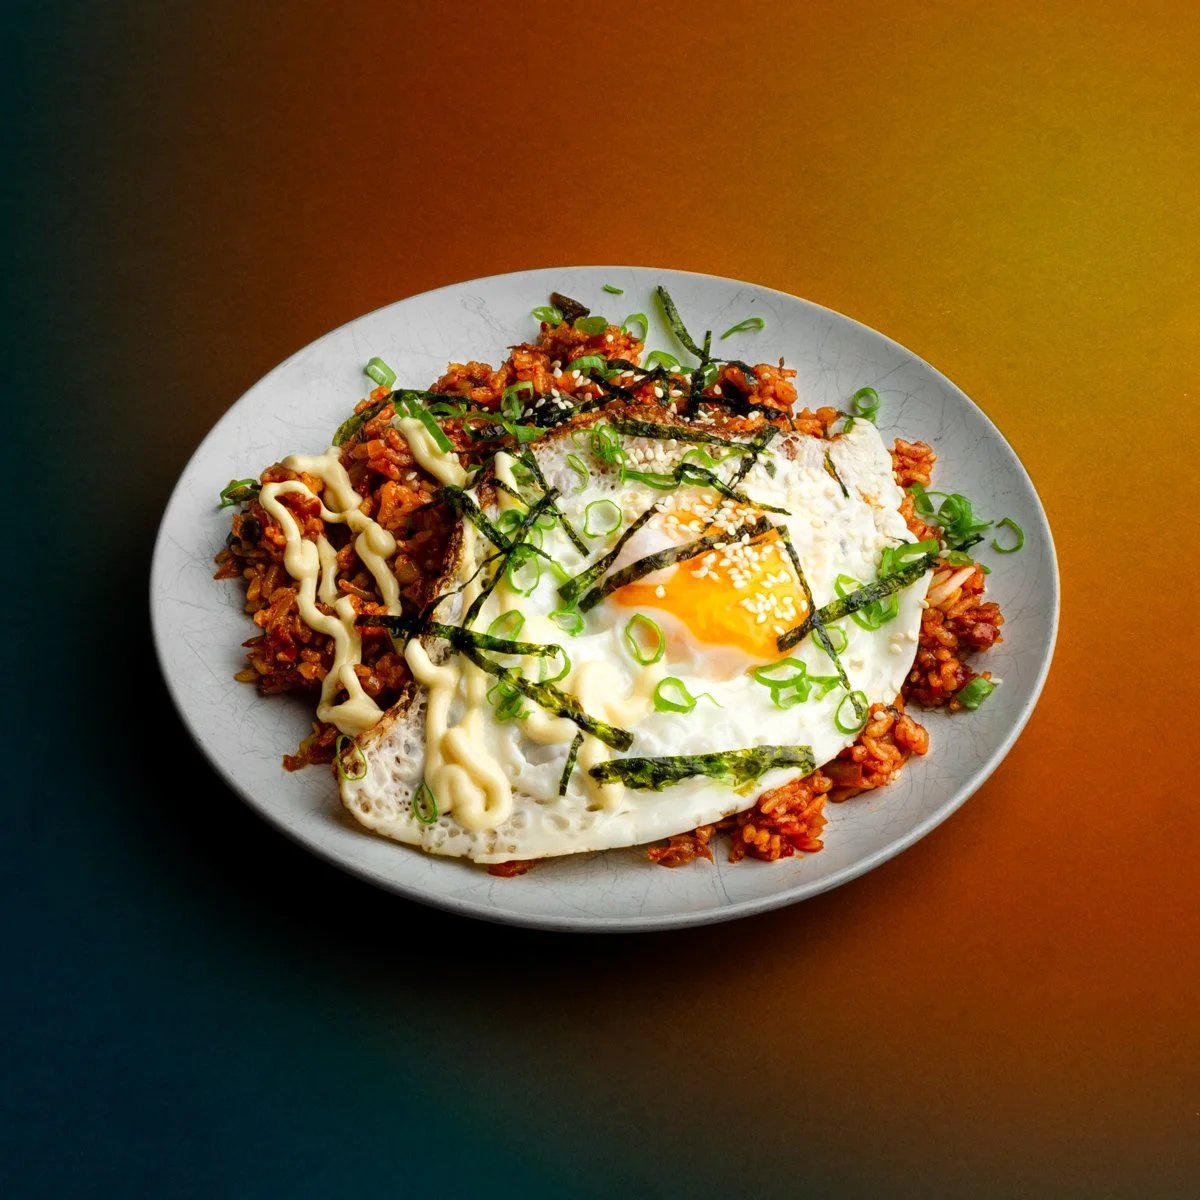
This is a very maximalist version of Kimchi Bokkeumbap. It’s a bit over the top for when you’re feeling like you need more than enough.
I’ve always felt that Korean fried rice is stylistically different from the kind that you see at Chinese restaraunts. It’s not necessarily just the ingredients, but an entirely different philosophy of rice that bears more resemblance to Jambalaya, some Paellas, or casseroles in general.
It’s stickier for one. A popular ideal of fried rice holds similar properties to a liquid being tossed around the wok. Each grain freely flowing among other grains of rice, vegetables and protein.
Korean fried rice is meant to clump, to be carved off with your spoon like sections of iceberg cleaving off. It’s heartier stuff, so much so that you can literally mold it, though I like it just fine in a giant pile.
It also means that technique-wise it’s more forgiving. You can be slow about cooking it if you’re still making it up as you go along. You can let your pantry be your muse while your vegetables cook down maybe a bit too much, or your meat gets a little char.
It’s great to make when you’re tired from a long day, or maybe just haven’t fully woken up yet. That is to say, it’s a good meal to make when you aren’t quite feeling yourself. And maybe, just maybe, it’ll help you get where you need to be.
Ingredients
Seasoning Sauce
1 Cup Kimchi (Drained and Chopped)
¼ Cup Kimchi Juice
1 Tbsp Soy Sauce
1 Tbsp Gochujang
Fry
2 Slices Bacon or 1 Slice Thick Cut (Make sure there’s a good mix of lean and fat)
4 Scallions (White only)
3 Cloves Garlic
1 Small Onion or ½ Medium Onion
2 Cups Rice (Leftover and frigid)
2 Tbsp Butter
1 Tbsp Sesame Oil
Salt to Taste
Topping
2 Eggs
1 Tbsp Vegetable Oil
Garnish
Gim
Sesame Seeds
Kewpie Mayo
Scallions (Greens)
Equipment
10” non-stick pan or well seasoned carbon steel or cast iron pan
Wooden spoon or silicone spatula
Spoon
Knife
Scissors (Optional)
Prep
Take your four Scallions and divide the whites from the greens. Finely slice the whites and set aside. Then, slice the greens into ½ inch to 2 inch lengths but finely dice the last inch so you can use those as a delicate garnish.
Chop your Onion. You can either do a fine or medium dice, or thinly slice rounds like you’re caramelizing onions. There’s no wrong way to chop this Onion, it’s just a matter of preference.
Sliver your Garlic. Mincing here will only increase the likelihood the garlic will burn.
Chop up your Kimchi into ¼ inch to ½ inch pieces. The crunchier and thicker white pieces can be smaller, but if you have tender greens in there you can leave them larger.
Chop up your Bacon. You can cube it or do lardons if you want a meatier texture.
Mix your 1 Tbsp of Gochujang with your ¼ Cup of Kimchi Juice** and 1 Tbsp of Soy Sauce until it forms a smooth mixture.
Take your Gim and either tear the pieces into bit size flakes, or you can use a knife or scissors to cut them into thin ribbons.
Fry
Start by heating up a non-stick or well-seasoned pan 10” pan to medium heat.
Once the pan is up to temperature add the bacon and start rendering the fat. The fat should be well-rendered after about two or three minutes.
Once there’s enough bacon grease in the pan add in your drained kimchi and stir it in the grease until it’s well coated. Let it cook for two to three minutes or until it starts browning.
Once the kimchi has begun browning you can toss in your sliced scallion whites and onion. You can move the bacon and kimchi mixture to the edges of the pan to make sure the onions take the brunt of the heat. Cook until they soften, another two to three minutes)
Stir the garlic in with the softened onions and push them off to the edge to make room for the rice.
Add your two tablespoons of butter to the center of the pan. Once the butter has melted you can add in your 2 Cups of cold rice. The rice will be stiff, so use a spatula or wooden spoon to gently but firmly break it apart and coat the grains with the melted butter.
Once the rice is well coated you can mix it with the bacon, kimchi, onion and garlic mixture.
Pour your seasoning sauce over the rice mixture and use your spatula or wooden spoon to make sure everything is coated.
Continue cooking until the rice reaches the desired consistency. It shouldn’t be gloppy, but you don’t necessarily want it so dry that the grains are fully separated.
Add the 1 Tbsp of sesame oil and mix it in with the rice well. Taste and add salt until you’re happy. Then transfer the rice to a plate or wide bowl.
Topping
Wipe out the pan if necessary. Then turn the heat to medium high and add 2 Tbsp of Vegetable Oil
Once the Vegetable Oil is shimmering crack your two Eggs into the pan
Tilt the pan so that the Vegetable Oil pools to one side and use a spoon to gather the hot oil and drip it over your Eggs. This will slowly cause them to bubble up. Repeat until the whites of the Eggs have set, or you can use a lid to trap heat to finish the whites. Should only take two to three minutes. You can also fully set the yolks if that is your preference.
Once the Eggs are set, turn the heat off and slide the eggs over your Kimchi Bokkeumbap.
Garnish
Squeeze a zig zag pattern with your Kewpie Mayo across the dish however you would like.
Sprinkle the flakes or ribbons of Gim on top.
Then sprinkle the Sesame Seeds and finely diced Scallion greens on top.
If you want you can drizzle more Sesame Oil on top.
Variants
You can re-mix this recipe a number of different ways. Change out the bacon for pork belly or spam, or whatever leftover meat is in your fridge (but make sure it’s fatty or add in some fat to make up for it). You can swap out the onions and scallions for leeks, or even just add whatever vegetables you need to get rid of to the mix. Lastly, this is a recipe that also works well cloaked in slices of American Cheese, or zig zagged with Sriracha if you want more heat.
*Kimchi is a fermented product and as a result its flavor profile changes over time. The best Kimchi to use for Kimchi Bokkeumbap is older Kimchi that has a very developed acidity. If your Kimchi isn’t quite aged enough you can boost the acidity with a little bit of Rice Wine Vinegar. It’s not perfect, but it’s better than nothing.
**Draining and pressing your kimchi both helps the kimchi cook well in your pan, but also provides the necessary Kimchi Juice for flavoring the dish. Pressing kimchi can be as simple as exerting pressure with a fork or spoon and letting it drain into a bowl.